Call For A Quote
866-296-3868
866-296-3868

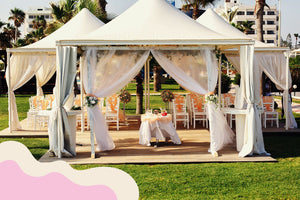
Organizing tables under an event tent is one of the most impactful design decisions for your wedding or social event. You want to balance guest flow, visual appeal, and comfort. Whether you're working with round tables, rectangular tables, charming sweetheart tables, or stylish cocktail tables, here are some layout ideas for three popular tent sizes: 20′×20′, 30′×30′, and 40′×100′.
This cozy footprint is ideal for intimate receptions or social gatherings. Seating capacity is limited, so efficiency is key.
Best for: 4 – 6 guests per table
Layout tip: Place two 60″ round tables side by side, with a narrow aisle between them. You’ll fit 8–12 guests comfortably.
Flow: Center aisle (about 3 ft) ensures easy entrance and mingling.
Best for: Buffet line or banquet-style seating
Layout tip: Two 4′ wide rectangular tables placed end-to-end create a 20′ long banquet layout seating about 16–20 guests.
Alternate idea: L‑shape layout—one table for food or presentation, the other for seating.
A single sweetheart table fits near one end of the tent, leaving room for a head table for 6 guests.
Keep decorations low and narrow to avoid overwhelming the narrow space.
Add 3–4 cocktail tables along one side for mingling—optional if standing reception is desired.
Keep pathways clear (minimum 4 ft clearance).
This size provides more flexibility. It suits up to 60 seated guests or a mix of seating and cocktail space.
Fit 6–8 round tables (60″), seating 6–8 each—ideal for 36–64 guests.
Layout: three rows of two tables, with 4 ft walkways between.
If hosting a buffet or head table, shift one row to make space.
Six 8′ banquet tables (2.5′ wide) seat 8 each—total 48 guests.
Layout: two rows of three tables, spaced for comfortable service aisles.
Center a 4′ sweetheart table at the back, flanked by 3–4 round or rectangular tables in front.
This draws attention to the couple while still accommodating 32–48 guests.
Dedicate one corner for 5–6 high-top cocktail tables.
Use this lounge/cocktail area during cocktail hour, then transition to dessert or lounge post-meal.
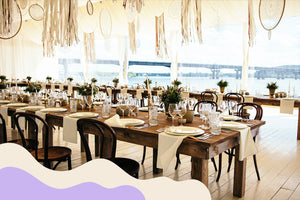
This expansive footprint can host full receptions, dance floors, bars, lounges, ceremony space—everything.
Dining Zone
Up to 24–28 round tables (60″), seating 6–8 each—approx. 150–200 diners.
Alternatively, use 30 × 8′ banquet tables for 240 seated guests.
Head/Sweetheart Tables
Sweetheart table at one end (4′ long) with a backdrop for photos—keeps it intimate.
Or use a long head table (8–10 guests) framed by sweetheart table nearby.
Cocktail Hour / Lounge
Shell off a corner (~20′×30′) with 10–15 cocktail tables and lounge seating.
Add a bar or stations along sightlines but out of traffic flow.
Dance Floor + DJ/Band
Reserve 20′×20′–30′×30′ at center or end.
Surround with round tables to keep guest engagement high.
Classic Layout: Entry → coat check → mingle tables → dining → sweetheart/head table → dance floor → cocktail lounge at rear.
Center Aisle Layout: Align round tables symmetrically on either side of 6′ center aisle facing sweetheart/head table—ideal for ceremony and reception reuse.
Banquet Feast: Long rectangular tables (8′) in parallel rows—communal vibe, ideal for large groups.
Use table sizing and spacing to shape ambiance:
Upscale chic: evenly spaced round tables.
Rustic charm: a mix of rectangular and round.
Modern twist: sweetheart table within dining floor, offset to prevent traffic jams.
Cocktail tables make perfect lounge zones; scatter rugs and lounge furniture for contrast.
Always leave 4–5 ft of clearance around tables and between zones.
Provide 6 – 8 ft wide aisles for buffet, bar, or ceremony entry.
Emphasize your sweetheart or head table with signage, lighting, or texture.
Orient lighting and drapery to highlight key areas (dance floor, cake table).
Position buffet on tent perimeter to reduce disruption.
Make bar accessible but not in traffic direct line.
Keep active zones (dance floor) away from center poles.
Use portable heaters or fans, depending on weather.
Adapt table density based on tent sidewalls and ventilation needs.
Draw full-scale floorplans or use 3D-event planning tools.
Measure real footprint, factoring in tent walls, doorways, and staging.
Whether you're operating in an intimate 20′×20′ space or designing a grand 40′×100′ event, your goal is consistent: serve your guests well, create fluid movement, and showcase your couple or speaker. Choose from round tables for conversation and ease, rectangular tables for communal or buffet styles, an elegant sweetheart table to spotlight the main pair, and cocktail tables to support mingling and lounge vibes—all housed within a beautiful event tent.
Combine thoughtful furniture placement, flow-conscious layout, and decorative focus, and you’ll turn any tent into the perfect stage for celebration. With careful planning and creativity, your event will feel effortless, intimate, and flawlessly fun. Enjoy the design process—and the event!
{"one"=>"Select 2 or 3 items to compare", "other"=>"{{ count }} of 3 items selected"}